Sunday, December 18, 2011

Personalized Stockings-using freezer paper stencils

Last year was my daughter, Ellie's, first Christmas. We bought her a stocking and hung it with the others. I had bought some embroidery thread, intending to sew her name on it, but it just never happened. I set it aside in a drawer after Christmas so that I would get it done. I tried once to start it, but was such a perfectionist about it that I took it all out because it didn't look right.
So, this year when we hung all the stockings, I was embarrassed to realize that it was still not done! (That's a casualty of being the fourth child, I suppose) So, I had an idea. I decided to try using a freezer paper stencil. Freezer paper stencils are really easy to use. I first used it on THIS project a little while back. For a good tutorial click HERE. I always get a little nervous on a project like this, though, because you only get one shot to get it right but it worked perfectly!

Preschool Welcome Board

During our preschool welcoming exercises, the kids sing "Here We Are Together". This is the little board I came up with so that the kids can place their 'person' at the school when we sing each of their names. The cutouts are from the "Everyday Paperdolls" cartridge using the Cricut machine. I borrowed the cartridge from a friend and it's really fun. I wanted "L" to have leggings so I just eyed those but I love the Crocs that "M" is wearing and there are so many options with that cartridge. I added the detail with a Sharpie marker and then laminated each of them. They stick to the schoolhouse(which I was too cheap to laminate so I covered in Contact paper) using sticky-back Velcro. I taped a small manilla envelope to the back to store the paperdolls when not in use as well. The kids' school is called "Happy Hands Preschool" which is why there is a hand at the top of the school in place of the bell- (I thought it might seem a little creepy without an explanation).
The kids get so excited to put their person on the board and I like that they each get to feel special when we sing each of their names every week.

Friday, December 9, 2011

Memory Stars {Ornaments}


Every year, I make my husband a Memory Star as one of his Christmas presents.

It contains words and pictures that summarize that year. We love to pull them out of the Christmas box each year and remember all of the biggest events from each of the years of our marriage. The events include pregnancies as well as births, graduations, moves, family vacations, etc. This year I am making our tenth star.


I buy the stars at Michaels for like $0.50 and paint them all the same shade of yellow. Some of the stars had a predrilled hole. Others I've had to drill myself. The past few have a ribbon simply hot glued to the back. The pictures are done with acrylic paint and the words are mostly done with a Sharpie marker after I've sprayed a clear coat of paint on each painted star to seal it. Some years have a lot of events crammed onto one star while others have just a few- depending on how eventful each year was.


They are really simple and cheap but have become one of our most treasured Christmas momentos.


Friday, December 2, 2011

Fabric Pendant- Christmas


I've been wanting to make fabric pendant banners for a while and am SO excited to have my Christmas ones done!  I found an awesome tutorial here that makes 4 banners.  2 work in our apartment just fine, but I am holding out hope that next year (in a house) we'll have room for all four.  I'm planning on doing a birthday one, as well as ones for Halloween, Thanksgiving, and maybe Valentine's day. 

So fun and festive!

Rainbow Cupcakes

So, along the same lines as my last post, I taught preschool again this week and chose the theme "Colors".  We talked about animals using colors as camoflauge or to be attractive. We also talked about color blending and we experimented with that using jars of water and food coloring. So, even though we learned about rainbows the last time I taught, I couldn't resist making these rainbow cupcakes for our color-themed lesson 'cause it was just too perfect.

Here's what you'll need:

A cake mix **(light colored- I used lemon, but a white cake mix would work great, too)
Food coloring (enough to make all shades of the rainbow)
Whipped Cream (I used light Cool Whip)
Cupcake liners

**Prepare cake as directed on box, OR-- I was trying to keep them as healthy as possible so I didn't feel too guilty about giving cupcakes to three year-olds right before lunch :) so I used applesauce in place of the oil, and egg whites instead of full eggs (the premixed kind I buy at Costco). The consistency was a little bit denser but the lemon flavor of the cake hid any other changes from substituting ingredients.  


After mixing the batter, I divided the batter into six bowls and added food coloring to each bowl. Then I spooned the batter into the cupcake liners, obviously starting with purple and worked my way up.  It took about an average sized spoonful of each of the six colors to fill each cupcake.  After each color addition, I lightly smoothed out each color to make sure it touched the edge of the liner so the color would show when the liner was peeled away later.

(The liners themselves looked pretty cool afterwards, too!)


Then, I baked them according to the directions.  After they completely cooled, I added a dollop of whipped cream and served them immediately. (Tip: Make SURE they are completely cooled before added the whipped cream, otherwise the whipped cream will slide off the top). :) 


 Enjoy!


Friday, November 4, 2011

Rainbow Jars and art project

I participate in a "mommy n' me" type preschool where I teach two days a week once a month (does that make sense?) This morning I was teaching the kids about water and rainbows and the amazing things that water can do.  These are the arts and crafts projects we made to go along with the lesson. 

I used six glass bowls and poured 1/2 t. vinegar into each one. Then I added 4-5 drops of food coloring to each one along with 1/2 c. rice and stirred it well.  After each bowl was mixed, I separated it into two sets of muffin tins )I didn't want it too deep so that the bottom wouldn't dry/cook. Then I baked the rice at 200 degrees F. for 45 minutes.

I found the basis for the idea HERE but didn't want to have the kids just glue the rice to the paper, so- I pulled out yet another bunch of old baby food jars.  We layered the rice in the jars and hot glued the lids shut. The kids spooned the rice in themselves and were so proud!  I think they turned out kinda cool!  


We also taped the crayons together to create a rainbow that they could easily draw on a large piece of butcher paper and then they glued cotton balls to the base of each side of the rainbow.

Monday, October 24, 2011

Spooky Halloween Wreath


Last year I saw an all black Halloween wreath on a blog somewhere and immediately loved the idea.  So, this year --when I finally got around to making it!-- I picked up all the supplies I needed at Dollar Tree (except the spray paint) and came up with this!

Supplies needed:

The spiders just stuck to the spider webbing in the back and didn’t even need to be glued.


I bought the darkest colored berry branches I could find- which were these deep red colored ones.  When I sprayed them with black spray paint, though, the paint made them shrivel up.  At first I was frustrated, but after looking at it a little longer, on second glance, I decided that it just added to the creepy-factor.

 
I put the whole thing together using primarily, hot glue.  The frame needed some thin wire to secure it to the wreath.  The raven came with wire attached to the bottom of the feet so that made it easy to secure as well. 

 I had an old plastic silver mirror (not pictured) I had picked up at Dollar Tree for a different project, but when I was putting together this wreath, I decided that it would be perfect to balance out the center of the wreath.  I sprayed it black, of course, and purposefully splattered some paint in the middle of the mirror to give it that old look.  {ooh! And I almost forgot- I had some leftover black turkey feathers from a previous project that helped fill in the edges of the wreath as well.  I attached them with some hot glue, too.}

Happy Halloween!


Saturday, October 15, 2011

Kid Friendly Meals

In an effort to get the kids a little more excited about dinner and to change things up a bit around here, we  had some little 'critters' for dinner.

My daughter, Natalie, received a kids' cook book as a birthday present from her grandparents.  We made a list last week of a few meals she wanted to try and used two of her recipes tonight. 

The first 'critter' was just made using a simple buttermilk pancake batter- and shaped into faces in the pan.  Then we used nutella (to make the faces stick) and frozen berries for the eyes, nose, and mouth.  


To make the second little critters (the hash brown faces), we used almost a full bag of frozen, shredded potatoes-slightly thawed, and mixed them with 2 eggs, 3/4 stick of butter, and some salt.  Wearing gloves, we rolled the mixture into balls, flattened onto greased baking sheets, and baked at 425 F until golden on the underside.  Then we flipped them over and baked until both sides were golden brown.  The faces were made with red peppers, radishes, and ketchup.


Our two boys were THRILLED to eat their dinner tonight and want Natalie to cook a lot more often.  I am much more encouraged to let them help a lot more in the kitchen-- especially after Natalie kept telling me that this was one of the best days of her entire life! It was truly quality one-on-one time in the kitchen.

Wednesday, October 5, 2011

Keep Calm- Halloween Art

I found this printable saying last year HERE and thought it was awesome!

Unfortunately, I didn't actually get around to using it until this year.  I remembered it earlier today, so I printed it out , and instead of framing it like I had originally planned, I mod-podged it to this Dollar Tree mirror that I spray-painted black. 

Now it resides on top of our entertainment center with some of our other Halloween decorations we unpacked this afternoon. I love a quick, easy, and festive craft!

Glass Finds

So, I LOVE thrift stores. LOVE LOVE LOVE them. I love the challenging of walking in the door, never knowing what you'll find and looking at something and trying to imagine what it could become.  Not that I'm amazing at it, I just like doing it.

I love Deseret Industries, specifically the one in Sacramento, but since we no longer live close, I make a point to stop by there if we ever happen to be in the area.   On a trip little while ago, I found all of these awesome different shaped glass jars, cups, etc.

I love using them for a variety of different things.  I love using mason jars as drinking glasses, and caraffes and milk bottles for liquids.


I love using anything other than a flower vase to put flowers in.  One of them is great for using for syrup, etc.  

I even found two diffent salt and pepper shakers and put them together for a mismatched set that I love because it is unexpected and it only cost me $1.


What do you use your glass jars/bottles for?

Friday, July 29, 2011

Felt Crayon Roll


My youngest daughter is just getting ready to start to learn how to color so I wanted to make something special just for her own little set of crayons.  I've seen a lot of my friends' kids have these adorable crayon rolls and have been wanting to make some of my own for some time now.  I searched online and came across a few ideas, but when I came across this one at Skip to My Lou, I fell in love because it was made of felt. I LOVE felt.  No hems-- it doesn't get better than that.  So, I used her tutorial and came up with this...


Puzzle Pockets


So I came across this awesome idea a little while back at Cluck Cluck Sew.  Isn't it genius?!


 I never knew how to store my kids' puzzles before, and I always kind of dreaded helping them organize the bin of them because it would, inevitably, get dumped out again.   I happened to have a bunch of sheets of felt on hand as well as sticky-back velcro, and, of course, I already had tons of hot glue.


I cut a strip of felt to be the top and used the rest of the piece for the bottom pocket.  I hot glued around the edge to get them to stay and  added the velcro--that was it.  I sat down and made pockets for all of our puzzles and it took about an hour.  

Now the puzzles are organized, easy to access, and don't ever get mixed up. 

Thursday, July 28, 2011

Latest project- a photo book of San Francisco

I've been working on this project for the last couple of weeks, trying to make this book that will be a gift to our kids for Christmas.  Since we have officially entered our last year here, we are trying to make as many memories as we possibly can. We took all the pictures from the book on our adventures. (The version I am printing for our kids is a little more personalized with our apartment complex, church building, schools, etc.)


Friday, July 15, 2011

Marble Mazes

,Long time, no blogging.
Things are finally slowing down around our house after quite a bit of traveling and sight seeing. Now that we're back home, and my husband is back in school, I was looking forward to spending time at the parks and enjoying the outdoors but the foggy cold weather along with my youngest two children being sick with a stomach flu has put a damper on those plans. While we wait for them to recover (and for some warmer weather-crazy mixed up SF), I've been trying to find things for my older two kids to do since we're stuck here. So, today, we tried Marble Mazes. It's a really cute idea that I found in a Family Fun Magazine. All you need is a shoe box lid (we used the box as well since we needed two), a bunch of straws cut into different sizes, tape, and a marble for each maze. The kids didn't need any assistance putting them together. They just taped the straw pieces down wherever they wanted until they ran out of straws. Then I gave them each a marble and they went to town. My son loves 'racing' the marble through the maze, complete with sound effects. Super easy. And tons of fun.

Saturday, June 18, 2011

Trying something new- Camping Foods

I haven't been up to a whole lot of blogging lately because my husband gets a whole month break during the summer and we end up packing in as much as we possibly can during that month. This last week was the first full week and we fit in a visit to in-laws, a camping trip, a trip to an amusement park, a beach trip, and had friends from out of town come to visit. Whew! On Monday, our family went camping for two nights in Yosemite National Park. SO gorgeous!! We got lucky and scored a reservation a friend had bought and wasn't able to use. I guess the reservations are in high demand and literally sell out in a minute or two of becoming avaiable online at the beginning of the year. If you haven't been there and live relatively close, I HIGHLY recommend going. It truly is amazing. We had a wonderful time and the kids LOVE to camp. My husband and I like it too, but it is a lot of work for the amount of time we actually spend there. I remind myself that the kids are making amazing memories and that makes it all worth it. When we go camping, we usually do the same old thing. Hot dogs. Cold cereal. Sandwiches. Smores. Not terribly exciting. Hot dogs get old after a while. So- I went online last week in search of some fun, new ideas. Unfortunately I forgot to save the links to a couple of blogs that I found but here are a few ideas that I really liked and ended up trying... (unfortunately I was too busy during the actual cooking of the meals to take any pics).
(Bridal Veil Falls)
We still ended up doing cold cereal (granola) and bagels with cream cheese for breakfast. And hot chocolate and roasted marshmallows for dessert--- Some things go with camping. :)
(My sweet daughter at breakfast-hence the very sleepy eyes still)
1. Keilbasa and Red Potatoes, Corn on the Cob
I bought a turkey keilbasa and sliced it up ahead of time. I put it in a ziploc bag in the cooler and reheated it in the pan over the fire when the potatoes were cooked. For the potatoes, I just washed them, poked them, wrapped them in foil, and set them in the coals. SO easy and they tasted great. They cooked up pretty fast. I'd say maybe in 15-20 minutes or so. For the cord, I left them in the husks, soaked them in water for a couple of minutes, then wrapped them in foil and put them in the coals as well. I turned them once. Then we unwrapped them, put them on corn-on-the-cob holders and served them with butter, salt, and pepper. (we'd done something similar at Girls camp as a youth but wrapped them in soaked newspaper instead. I like the foil a bit better, I think).
2. Walking Tacos
I knew my kids would love even just the name of these. I came across this idea on line and modified it a bit to fit our family. I started by browning ground turkey ahead of time and seasoning it with taco seasoning and storing it in a ziploc bag. I also brought a can of sliced olives, shredded cheese, a few tomatoes, chopped lettuce, a bag of Cool Ranch Doritos, a small jar of salsa, and a small container of fat-free sour cream, mixed with a packet of taco seasoning. I gave each family member a gallon-size ziploc bag to mix their ingredients in. The kids' favorite part was shaking up the bags to mix it all up. They were all giggling and saying they were going to "shake it crazy". The original idea is to eat it straight from the bag but we ended up dumping it onto paper plates. Maybe next time quart sized bags to make it a little easier.
3. Pita Pizzas
This is probably my favorite of the three cooked meals we made during the trip. And the easiest. I bought a couple of packs of whole wheat pita pockets. I brought a jar of Ragu Chunky style spaghetti sauce, mozzarella cheese, and cheddar cheese, as well as pepperoni and sliced olives. I assembled the pizzas by putting everything into the halved pita pockets and wrapping them individually in foil. Then I set them in the coals for a few minutes and turned them once. They ended up gooey, and the bread actually hardened up to taste a lot like a pizza crust. Mmmm. They were awesome. The one thing I will do differently is remember to bring tongs. Duh. Can't believe I forgot that. We were able to improvise and use our marshmallow sticks but it wasn't nearly as easy.
Trying new meals and having success makes me that much more excited for the next trip and seeing what other creative ideas we can try out. 
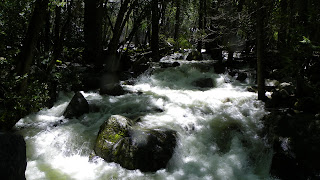
(Bridal Veil Falls-at the bottom) For an eerily-similar post, click HERE. I swear my sister and I are living parallel lives. Too crazy! :)

Friday, May 27, 2011

Teacher Thank you gift

For the last day of school, I wanted to have a small thank you for Natalie's teacher, because as I've said many times before- she is amazing.
I originally had plans to buy a vase, etch an initial on it, and fill it with flowers. But, Ross stores that I checked, didn't have any good vases. I decided that I'd have to change up the plan a little. I bought this little pitcher- which I have been wanting to get for myself. :) I LOVE IT. It was $2.99. I love using other containers for vases anyway so I actually liked this better than the original idea. I bought a small bouquet of mini carnations at Safeway (for $3.99) and cut them down to fit. I tied a ribbon around the pitcher and made a card to attach to a skewer to place inside the bouquet.
We also made a fresh batch of chocolate chip cookies and placed them, still warm, in a white lunch bag and tied it with a ribbon to deliver after school.