Sunday, December 18, 2011

Personalized Stockings-using freezer paper stencils

Last year was my daughter, Ellie's, first Christmas. We bought her a stocking and hung it with the others. I had bought some embroidery thread, intending to sew her name on it, but it just never happened. I set it aside in a drawer after Christmas so that I would get it done. I tried once to start it, but was such a perfectionist about it that I took it all out because it didn't look right.
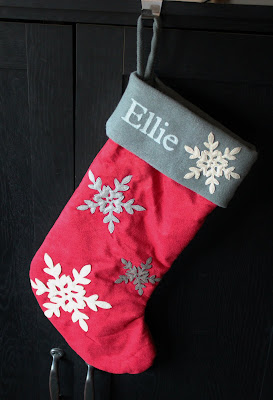
So, this year when we hung all the stockings, I was embarrassed to realize that it was still not done! (That's a casualty of being the fourth child, I suppose) So, I had an idea. I decided to try using a freezer paper stencil. Freezer paper stencils are really easy to use. I first used it on THIS project a little while back. For a good tutorial click HERE. I always get a little nervous on a project like this, though, because you only get one shot to get it right but it worked perfectly!

Preschool Welcome Board

During our preschool welcoming exercises, the kids sing "Here We Are Together". This is the little board I came up with so that the kids can place their 'person' at the school when we sing each of their names. The cutouts are from the "Everyday Paperdolls" cartridge using the Cricut machine. I borrowed the cartridge from a friend and it's really fun. I wanted "L" to have leggings so I just eyed those but I love the Crocs that "M" is wearing and there are so many options with that cartridge. I added the detail with a Sharpie marker and then laminated each of them. They stick to the schoolhouse(which I was too cheap to laminate so I covered in Contact paper) using sticky-back Velcro. I taped a small manilla envelope to the back to store the paperdolls when not in use as well. The kids' school is called "Happy Hands Preschool" which is why there is a hand at the top of the school in place of the bell- (I thought it might seem a little creepy without an explanation).
The kids get so excited to put their person on the board and I like that they each get to feel special when we sing each of their names every week.

Friday, December 9, 2011

Memory Stars {Ornaments}


Every year, I make my husband a Memory Star as one of his Christmas presents.

It contains words and pictures that summarize that year. We love to pull them out of the Christmas box each year and remember all of the biggest events from each of the years of our marriage. The events include pregnancies as well as births, graduations, moves, family vacations, etc. This year I am making our tenth star.


I buy the stars at Michaels for like $0.50 and paint them all the same shade of yellow. Some of the stars had a predrilled hole. Others I've had to drill myself. The past few have a ribbon simply hot glued to the back. The pictures are done with acrylic paint and the words are mostly done with a Sharpie marker after I've sprayed a clear coat of paint on each painted star to seal it. Some years have a lot of events crammed onto one star while others have just a few- depending on how eventful each year was.


They are really simple and cheap but have become one of our most treasured Christmas momentos.


Friday, December 2, 2011

Fabric Pendant- Christmas


I've been wanting to make fabric pendant banners for a while and am SO excited to have my Christmas ones done!  I found an awesome tutorial here that makes 4 banners.  2 work in our apartment just fine, but I am holding out hope that next year (in a house) we'll have room for all four.  I'm planning on doing a birthday one, as well as ones for Halloween, Thanksgiving, and maybe Valentine's day. 

So fun and festive!

Rainbow Cupcakes

So, along the same lines as my last post, I taught preschool again this week and chose the theme "Colors".  We talked about animals using colors as camoflauge or to be attractive. We also talked about color blending and we experimented with that using jars of water and food coloring. So, even though we learned about rainbows the last time I taught, I couldn't resist making these rainbow cupcakes for our color-themed lesson 'cause it was just too perfect.

Here's what you'll need:

A cake mix **(light colored- I used lemon, but a white cake mix would work great, too)
Food coloring (enough to make all shades of the rainbow)
Whipped Cream (I used light Cool Whip)
Cupcake liners

**Prepare cake as directed on box, OR-- I was trying to keep them as healthy as possible so I didn't feel too guilty about giving cupcakes to three year-olds right before lunch :) so I used applesauce in place of the oil, and egg whites instead of full eggs (the premixed kind I buy at Costco). The consistency was a little bit denser but the lemon flavor of the cake hid any other changes from substituting ingredients.  


After mixing the batter, I divided the batter into six bowls and added food coloring to each bowl. Then I spooned the batter into the cupcake liners, obviously starting with purple and worked my way up.  It took about an average sized spoonful of each of the six colors to fill each cupcake.  After each color addition, I lightly smoothed out each color to make sure it touched the edge of the liner so the color would show when the liner was peeled away later.

(The liners themselves looked pretty cool afterwards, too!)


Then, I baked them according to the directions.  After they completely cooled, I added a dollop of whipped cream and served them immediately. (Tip: Make SURE they are completely cooled before added the whipped cream, otherwise the whipped cream will slide off the top). :) 


 Enjoy!