Wednesday, January 25, 2012

How to Make Your Own Chevron Stencil {Freezer Paper on Fabric}

I've been needing to re-do my couch throw-pillows for a while now, but couldn't decide on exactly what I wanted to do.
So, when I came across a picture of this pillow on Pinterest, it got me to thinking...

(source)

I had already made a felt flower pillow, that I loved, but the white fabric I used as a background had been ruined my our 18 month old (blue marker and a bloody lip). So, I started brainstorming ways to reuse the flower and decided to carefully cut around the flower and restitch it on to another pillow. It worked! But I didn't want to use another plain, light-colored fabric again so I was really excited when I came across an idea on Pinterest about how to create your own Chevron stencil on a wall. It inspired me to try to put in on fabric-- that way I could get the exact color I wanted.

I made a grid on a large sheet of butcher paper and connected the corners to make the chevron pattern. Once I had a couple of lines done, I laid a piece of freezer paper over the top and began tracing, moving it up and overlaying the pattern as I went.
Once I had the whole pattern done, I used an X-acto knife to cut the pattern out, leaving the outer edge uncut so that it all remained in one piece.
After ironing the majority of it town, I trimmed the edges and re-ironed the outside edge to make sure it was on there securely.
Then I was ready to paint. (I mixed a few colors I had on hand to get the shade of yellow I wanted. I used an extra baby food jar to keep the leftover paint in for future projects.
Once it was dry, I peeled away the stencil and had a great piece of fabric that was ready to sew my flower onto. (Forgot to snap a picture of the plain material after it dried-dang it.)
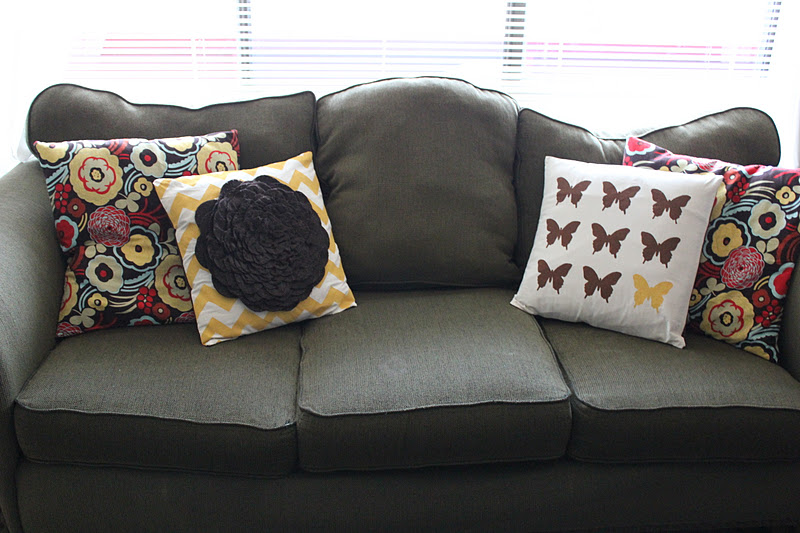
I'm really happy with how it turned out. I really like how sometimes a small change, like a pillow, can make the room feel so different. (Butterfly pillow soon to come).

Tuesday, January 10, 2012

Date Night Kit

Looking for a fun and easy gift for a couple? Here is a really simple idea that we gave a few of our friends and family these this past Christmas-- A Date Night Kit!
What's inside:
Red Vines
Reeses Minature Cups
3 Packages of Microwave popcorn
Peppermint Bark
5 Redbox Rental CodesBucket (also to use to put popcorn in)
I printed up a piece of paper containing 5 Redbox Codes (which you can buy on their website). I put them inside of a folded piece of paper with the instructions glued to the back.
Ghiradelli's Pepperent Bark- We LOVE this stuff. So so good. One friend dislikes mint, however, so we substituted another favorite instead- chocolate covered raisins.
Redbox Codes: I purchased these codes from the Redbox website, but they are only made to print out using only one code per full sheet of paper. In order to fit them all in a small place, I copied and pasted the codes onto one small paper and glued it to the Christmas paper. Then I cut and glued the Redbox instructions to the outside of the envelope. Who doesn't love a good date night? :)

Sunday, January 8, 2012

SPY Kit!

Have some super sneaky little spies at home? We definitely do! Our kids are very much into Inspector Gadget, the Spy Kids movies, and ANY thing spy-related, so... I came up with these.
Here's how to make your own:
1. Draw string bag to carry all supplies in.
The bag is made of felt (I bought a remnant at Jo Ann's that easily made 3 bags and cost less than $2) and the letters are painted on using white paint and then glow-in-the-dark paint.
I LOVE glow in the dark paint! That stuff is amazing! It works on clothes and can be washed and dried, and still works like charm. I thought it might add a fun little surprise for the kids to see that the bag glows.
The letters were stenciled using freezer paper stencils. I used the Cricut to cut the letters but had a hard time getting the small letters to cut without ripping the paper. Finally I realized that it was the depth of the blade that needed to be adjusted so that it wasn't cutting too deep.
2. Disguises
Every good spy needs at lest a few disguises so I bought these glasses at Dollar Tree. They look hilarious on! (See the end of this post)
3. Aliases
I printed these up using THIS website. I printed up their pictures and glued them to the paper before laminating the whole thing. Later, the kids wrote their names using Sharpie markers on top of the lamination.
4. Mini Camera
I LOVE this camera. Probably my favorite part of the whole kit. I was so excited to find these at Dollar Tree right around Christmas time. I went back later to buy more to keep extras on hand but they only had one left. Very popular apparently. They sound just like a real camera and even has a little tiny flash. The kids have SO much fun with it.
5. Highly Confidential Notebook
Great for any notes on suspicious persons. Another Dollar Tree find. I printed out the image from THIS site. and glued it inside the transparent pocket. I also tucked the spy ID cards into a pocket of the notebook for safekeeping.
6. Pens, magnifying glasses, and glow sticks
(I forgot to get a separate pictures of these but they're pretty self-explanatory. Picked them all up at Dollar Tree as well. The glow sticks are just to give the kids a little bit of extra dark while spying in the dark (a little less hassle than a flashlight). The magnifying glasses came in a 3-pack that were all different which was awesome since these kits went to families with multiple kids. Plenty to go around.
7. Mustaches
Just a few more disguises cause you never know when you might need one. :) I found an awesome tutorial for these at Easy Makes Me Happy! and used them for another project for a friend a couple of months ago. I'd been wanting to make some for our family and this was the perfect excuse!
Let the spying BEGIN!