Tuesday, November 27, 2012

Lemon Cupcakes with Raspberry Curd

 
I've always wanted to try making cupcakes with filling but was always intimidated by the idea of it, so I was pleasantly surprised that when I made these cupcakes for a church event this month, they turned out awesome!  It was time consuming (probably because I was a first timer) but not difficult. 
I found the original idea here and only made one modification from the original recipe.  Being that I was a little short on time that day, I used a regular lemon cake mix from a box. (I'm sure they'd be amazing from scratch- but honestly, they were great just the same).

Wednesday, August 1, 2012

Random Tip- Water colors

 I came up with an idea to day that I thought I'd pass along.

 In the past, I've tried using a spray bottle to add water to water colors and it worked okay- not perfect, but okay.  As I was getting the water colors out today, I thought I'd try something different- a Wilton's Candy Making Squeeze Bottle.  It lets you add just the right amount of water without any mess! Just thought I'd share.

Monday, July 30, 2012

Swim Noodle Wreath

 I've seen ideas for taking plumbing insulation for making a wreath (Of course on Pinterest) and thought that was really smart. So, I went to buy one at Lowe's, not realizing that it was really really thin. 
 I wanted something a little thicker so I started brainstorming what would be thicker and still flexible enough to make a circle. 
And then it hit me. A swim noodle! They're super cheap and everywhere since it's summer so I headed over to Wal-Mart and picked one up.
 I cut it to the desired shape and used some clear duct tape to connect the ends.

Here's the finished product!

Friday, July 27, 2012

Painted Mason Jars

I've seen a lot of painted mason jars on Pinterest lately and I LOVE it, so I decided to try some of my own. I used some of the favorite jars I inherited from my grandmother.  I think adding the paint on the inside really brings out the details and unique shape of each jar.
   
 I didn't take any pictures of the process. (I was too excited to do it to stop and take pics). But, I think the process is so easy, it doesn't really need pics to explain.  I took an empty, clean mason jar, and squirted some acrylic paint into the jar and turned/spun the jar until the paint covered the entire inside surface of jars.  Then, I layed out a brown paper bag and stacked 2 stacks of 2 popscicle sticks each to balance the jars on, allowing the excess paint to run off onto the bag.(I founds that idea on another blog- unfortunately I can't seem to find it to link up to when looking back).  I let it drip like that for about an hour. Then, I turned the jars over and let them dry over night.  Easy enough!

Thursday, July 26, 2012

We Moved!

After living in California for our whole lives, and in beautiful San Francisco for the last three, we have taken a huge plunge and moved to the Midwest. My husband graduated and now is a practicing dentist. So,we are now living in Missouri and loving it!  Now that we are unpacked and settled, I am super excited to get back into crafting again. So, after a much needed break, I'm finally ready to post again!

Sunday, February 19, 2012

Lego Table

I came across this idea on Pinterest about a month before Christmas. It's so simple! I knew it would be perfect for our kids- who are SUPER into legos, so I picked up the end table from IKEA for $8 and ordered the Lego base squares from Amazon. They were about $6/each.  Then I picked up a bottle of Gorilla glue at Target and assembled it.  On Christmas morning, my husband had a whole castle set up on the table when the kids came down stairs to see it. I doubt a single day has gone by that the kids haven't used the table.

Saturday, February 4, 2012

Love Note (Dry Erase)


 When my husband and I first got married, we used to leave each other love notes around the house all the time but as life got crazier, little things like that tend to get forgotten. This frame idea, that I found on Pinterest, makes it so simple and easy to leave a quick little love note whenever I am thinking about it and my husband likes to leave notes on here, too. It has been so fun to walk into my room and find a new note waiting for me. :)

(I changed up the design a little bit and used an IKEA frame.  I made the felt flowers and hot glued them to the front.  I cut a small rectangle of felt and glued it to the back to make a pocket for the pen so it doesn't get lost.) Great Valentines Gift, don't you think?

Wednesday, January 25, 2012

How to Make Your Own Chevron Stencil {Freezer Paper on Fabric}

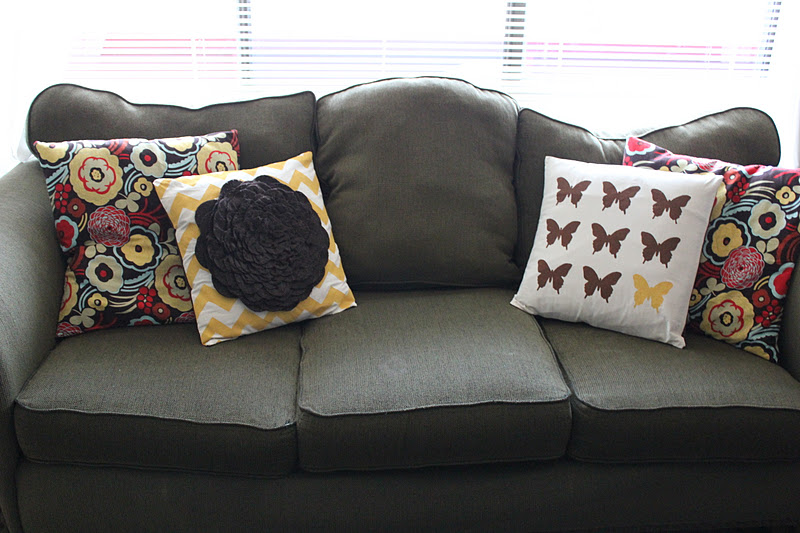
I've been needing to re-do my couch throw-pillows for a while now, but couldn't decide on exactly what I wanted to do.
So, when I came across a picture of this pillow on Pinterest, it got me to thinking...

(source)

I had already made a felt flower pillow, that I loved, but the white fabric I used as a background had been ruined my our 18 month old (blue marker and a bloody lip). So, I started brainstorming ways to reuse the flower and decided to carefully cut around the flower and restitch it on to another pillow. It worked! But I didn't want to use another plain, light-colored fabric again so I was really excited when I came across an idea on Pinterest about how to create your own Chevron stencil on a wall. It inspired me to try to put in on fabric-- that way I could get the exact color I wanted.

I made a grid on a large sheet of butcher paper and connected the corners to make the chevron pattern. Once I had a couple of lines done, I laid a piece of freezer paper over the top and began tracing, moving it up and overlaying the pattern as I went.
Once I had the whole pattern done, I used an X-acto knife to cut the pattern out, leaving the outer edge uncut so that it all remained in one piece.
After ironing the majority of it town, I trimmed the edges and re-ironed the outside edge to make sure it was on there securely.
Then I was ready to paint. (I mixed a few colors I had on hand to get the shade of yellow I wanted. I used an extra baby food jar to keep the leftover paint in for future projects.
Once it was dry, I peeled away the stencil and had a great piece of fabric that was ready to sew my flower onto. (Forgot to snap a picture of the plain material after it dried-dang it.)
I'm really happy with how it turned out. I really like how sometimes a small change, like a pillow, can make the room feel so different. (Butterfly pillow soon to come).

Tuesday, January 10, 2012

Date Night Kit

Looking for a fun and easy gift for a couple? Here is a really simple idea that we gave a few of our friends and family these this past Christmas-- A Date Night Kit!
What's inside:
Red Vines
Reeses Minature Cups
3 Packages of Microwave popcorn
Peppermint Bark
5 Redbox Rental CodesBucket (also to use to put popcorn in)
I printed up a piece of paper containing 5 Redbox Codes (which you can buy on their website). I put them inside of a folded piece of paper with the instructions glued to the back.
Ghiradelli's Pepperent Bark- We LOVE this stuff. So so good. One friend dislikes mint, however, so we substituted another favorite instead- chocolate covered raisins.
Redbox Codes: I purchased these codes from the Redbox website, but they are only made to print out using only one code per full sheet of paper. In order to fit them all in a small place, I copied and pasted the codes onto one small paper and glued it to the Christmas paper. Then I cut and glued the Redbox instructions to the outside of the envelope. Who doesn't love a good date night? :)

Sunday, January 8, 2012

SPY Kit!

Have some super sneaky little spies at home? We definitely do! Our kids are very much into Inspector Gadget, the Spy Kids movies, and ANY thing spy-related, so... I came up with these.
Here's how to make your own:
1. Draw string bag to carry all supplies in.
The bag is made of felt (I bought a remnant at Jo Ann's that easily made 3 bags and cost less than $2) and the letters are painted on using white paint and then glow-in-the-dark paint.
I LOVE glow in the dark paint! That stuff is amazing! It works on clothes and can be washed and dried, and still works like charm. I thought it might add a fun little surprise for the kids to see that the bag glows.
The letters were stenciled using freezer paper stencils. I used the Cricut to cut the letters but had a hard time getting the small letters to cut without ripping the paper. Finally I realized that it was the depth of the blade that needed to be adjusted so that it wasn't cutting too deep.
2. Disguises
Every good spy needs at lest a few disguises so I bought these glasses at Dollar Tree. They look hilarious on! (See the end of this post)
3. Aliases
I printed these up using THIS website. I printed up their pictures and glued them to the paper before laminating the whole thing. Later, the kids wrote their names using Sharpie markers on top of the lamination.
4. Mini Camera
I LOVE this camera. Probably my favorite part of the whole kit. I was so excited to find these at Dollar Tree right around Christmas time. I went back later to buy more to keep extras on hand but they only had one left. Very popular apparently. They sound just like a real camera and even has a little tiny flash. The kids have SO much fun with it.
5. Highly Confidential Notebook
Great for any notes on suspicious persons. Another Dollar Tree find. I printed out the image from THIS site. and glued it inside the transparent pocket. I also tucked the spy ID cards into a pocket of the notebook for safekeeping.
6. Pens, magnifying glasses, and glow sticks
(I forgot to get a separate pictures of these but they're pretty self-explanatory. Picked them all up at Dollar Tree as well. The glow sticks are just to give the kids a little bit of extra dark while spying in the dark (a little less hassle than a flashlight). The magnifying glasses came in a 3-pack that were all different which was awesome since these kits went to families with multiple kids. Plenty to go around.
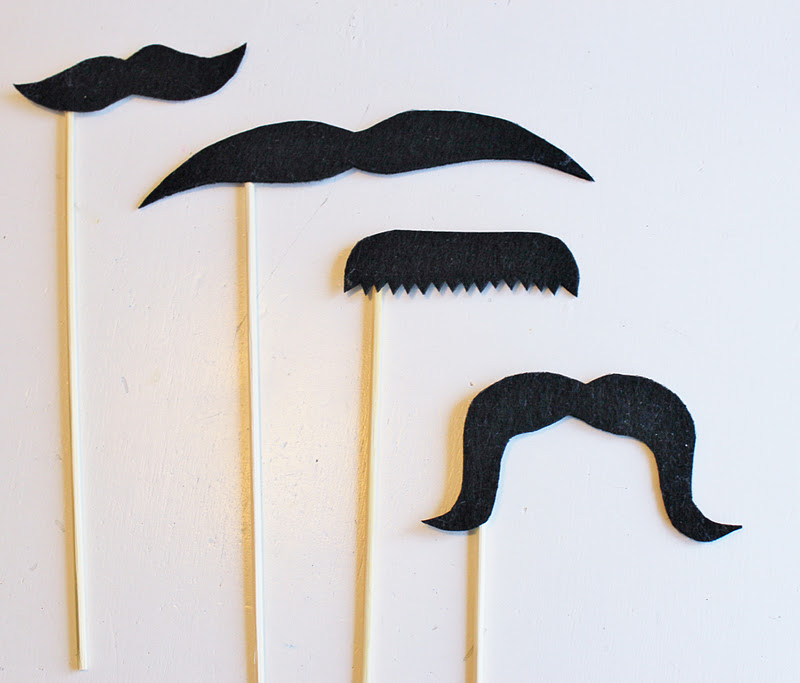
7. Mustaches
Just a few more disguises cause you never know when you might need one. :) I found an awesome tutorial for these at Easy Makes Me Happy! and used them for another project for a friend a couple of months ago. I'd been wanting to make some for our family and this was the perfect excuse!
Let the spying BEGIN!

Sunday, December 18, 2011

Personalized Stockings-using freezer paper stencils

Last year was my daughter, Ellie's, first Christmas. We bought her a stocking and hung it with the others. I had bought some embroidery thread, intending to sew her name on it, but it just never happened. I set it aside in a drawer after Christmas so that I would get it done. I tried once to start it, but was such a perfectionist about it that I took it all out because it didn't look right.
So, this year when we hung all the stockings, I was embarrassed to realize that it was still not done! (That's a casualty of being the fourth child, I suppose) So, I had an idea. I decided to try using a freezer paper stencil. Freezer paper stencils are really easy to use. I first used it on THIS project a little while back. For a good tutorial click HERE. I always get a little nervous on a project like this, though, because you only get one shot to get it right but it worked perfectly!

Preschool Welcome Board

During our preschool welcoming exercises, the kids sing "Here We Are Together". This is the little board I came up with so that the kids can place their 'person' at the school when we sing each of their names. The cutouts are from the "Everyday Paperdolls" cartridge using the Cricut machine. I borrowed the cartridge from a friend and it's really fun. I wanted "L" to have leggings so I just eyed those but I love the Crocs that "M" is wearing and there are so many options with that cartridge. I added the detail with a Sharpie marker and then laminated each of them. They stick to the schoolhouse(which I was too cheap to laminate so I covered in Contact paper) using sticky-back Velcro. I taped a small manilla envelope to the back to store the paperdolls when not in use as well. The kids' school is called "Happy Hands Preschool" which is why there is a hand at the top of the school in place of the bell- (I thought it might seem a little creepy without an explanation).
The kids get so excited to put their person on the board and I like that they each get to feel special when we sing each of their names every week.

Friday, December 9, 2011

Memory Stars {Ornaments}


Every year, I make my husband a Memory Star as one of his Christmas presents.

It contains words and pictures that summarize that year. We love to pull them out of the Christmas box each year and remember all of the biggest events from each of the years of our marriage. The events include pregnancies as well as births, graduations, moves, family vacations, etc. This year I am making our tenth star.


I buy the stars at Michaels for like $0.50 and paint them all the same shade of yellow. Some of the stars had a predrilled hole. Others I've had to drill myself. The past few have a ribbon simply hot glued to the back. The pictures are done with acrylic paint and the words are mostly done with a Sharpie marker after I've sprayed a clear coat of paint on each painted star to seal it. Some years have a lot of events crammed onto one star while others have just a few- depending on how eventful each year was.


They are really simple and cheap but have become one of our most treasured Christmas momentos.


Friday, December 2, 2011

Fabric Pendant- Christmas


I've been wanting to make fabric pendant banners for a while and am SO excited to have my Christmas ones done!  I found an awesome tutorial here that makes 4 banners.  2 work in our apartment just fine, but I am holding out hope that next year (in a house) we'll have room for all four.  I'm planning on doing a birthday one, as well as ones for Halloween, Thanksgiving, and maybe Valentine's day. 

So fun and festive!

Rainbow Cupcakes

So, along the same lines as my last post, I taught preschool again this week and chose the theme "Colors".  We talked about animals using colors as camoflauge or to be attractive. We also talked about color blending and we experimented with that using jars of water and food coloring. So, even though we learned about rainbows the last time I taught, I couldn't resist making these rainbow cupcakes for our color-themed lesson 'cause it was just too perfect.

Here's what you'll need:

A cake mix **(light colored- I used lemon, but a white cake mix would work great, too)
Food coloring (enough to make all shades of the rainbow)
Whipped Cream (I used light Cool Whip)
Cupcake liners

**Prepare cake as directed on box, OR-- I was trying to keep them as healthy as possible so I didn't feel too guilty about giving cupcakes to three year-olds right before lunch :) so I used applesauce in place of the oil, and egg whites instead of full eggs (the premixed kind I buy at Costco). The consistency was a little bit denser but the lemon flavor of the cake hid any other changes from substituting ingredients.  


After mixing the batter, I divided the batter into six bowls and added food coloring to each bowl. Then I spooned the batter into the cupcake liners, obviously starting with purple and worked my way up.  It took about an average sized spoonful of each of the six colors to fill each cupcake.  After each color addition, I lightly smoothed out each color to make sure it touched the edge of the liner so the color would show when the liner was peeled away later.

(The liners themselves looked pretty cool afterwards, too!)


Then, I baked them according to the directions.  After they completely cooled, I added a dollop of whipped cream and served them immediately. (Tip: Make SURE they are completely cooled before added the whipped cream, otherwise the whipped cream will slide off the top). :) 


 Enjoy!


Friday, November 4, 2011

Rainbow Jars and art project

I participate in a "mommy n' me" type preschool where I teach two days a week once a month (does that make sense?) This morning I was teaching the kids about water and rainbows and the amazing things that water can do.  These are the arts and crafts projects we made to go along with the lesson. 

I used six glass bowls and poured 1/2 t. vinegar into each one. Then I added 4-5 drops of food coloring to each one along with 1/2 c. rice and stirred it well.  After each bowl was mixed, I separated it into two sets of muffin tins )I didn't want it too deep so that the bottom wouldn't dry/cook. Then I baked the rice at 200 degrees F. for 45 minutes.

I found the basis for the idea HERE but didn't want to have the kids just glue the rice to the paper, so- I pulled out yet another bunch of old baby food jars.  We layered the rice in the jars and hot glued the lids shut. The kids spooned the rice in themselves and were so proud!  I think they turned out kinda cool!  


We also taped the crayons together to create a rainbow that they could easily draw on a large piece of butcher paper and then they glued cotton balls to the base of each side of the rainbow.